The information, images,
and texts contained in
this website is
copyrighted
by Kateryna Vrublevska of ArtLife
and may not be distributed, modified, reproduced in whole
or in
part without my prior, handwritten and signed consent.
Thank you!
copyrighted by Kateryna Vrublevska of ArtLife and may not be distributed, modified, reproduced in whole
or in part without my prior, handwritten and signed consent.
Leaves
 |
| KLICK HERE |
Crimped Flowers

Quilling Basics
 |
| KLICK HERE |
Pink Royal Flower
 |
| KLICK HERE |
 |
| KLICK HERE |
Shaded Flower |
| KLICK HERE Small Daisies |
 |
| KLICK HERE |
Husking Flower
Husking quilling is quite simple and nicely looking technique. There are some tutorials in Web, but today I want to present my own version for quilled clematis.You will need:
1. Pins
2. Mat or board
3. Glue
4. 2mm or 3mm strips
5. Scissors
6. Template
You will need one "a" element, two of "b" elements and 2 of "c" elements.

Preserve the template with the tape and stick it to the board.

Glue the end of strip and make a loop to fix the strip.

Put the pin with the strip into the board, put another one and make a loop.

Make several simple petals and glue it together.

Fix it on the board and wind the whole shape by the paper strip. Put all complex petals together and make the center fringed element.


You can use different number of pins and different layouts. It will help you to make interesting shapes for your quilling projects.
Happy quilling!
Beehive tutorial
1. To make a bee hive pattern you need:
- 2-3 strips of yellow paper (width –
5 mm; 130-160 gsm);
-a knife;
-tweezers;
-a ruler;
-tissue paper to make soft surface;
-glue;
-decorations (in my case it is micro-beads for nail-art and acrylic polish).
2. Make a hexagon. Put a strip between tissue paper and the ruler. Take
your knife and mark every 3 mm on the strip, if you make it 5 mm, your hexagon
will too large. Tissue paper prevent our strip from being cut and make marks
quite visible. So, use it.

3. First, mark all your strips.
4. Then cut
them onto segments: the first and the secondo one – 7 segments, the rest of
them – 6 segments.
5. Glue the 1st
segment with the 7th one.
6. Next hexagons glue to the first two with 1 and 6 segment. In that
way you will get very neat bee hive.

7. Once you
have finished the whole bee hive glue its border with another strip. You may add
a bee to your bee hive to make it complete.
You can also make rhombus, hexagon or rectangle shape.
8. Decorate it with micro-beads or yellow glitter (honey) and cover it with
acrylic polish, or another one you have.
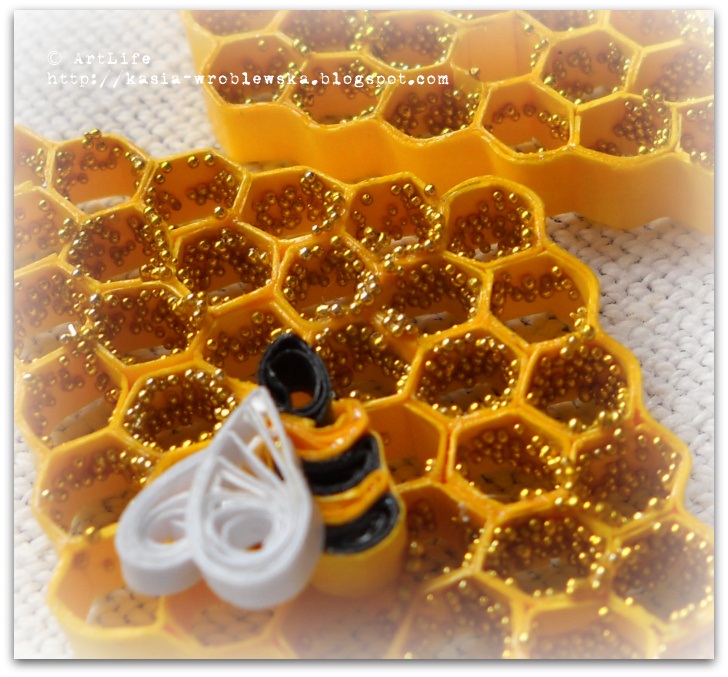
Use bee hive as
decoration to your cards, layouts or as jewellery.
Thank you for your
attention!
***
Maple leaf tutorial
1-3. We need a "sandwich" made with three pieces of corrugated fiberboard, glue, maple leaf template and transparent tape. This tape will protect your leaf not to glue to the temlate.4-5. Instruments & materials we use: pins, scissors, tweezers, glue, strips of paper (3 mm) [red strips are 130 gsm, and yellow and orange ones are 80 gsm] and leaf template.

6-9. make a skelet of your leaf with the help of template, pins and tweezers, using red strips for this purpose.

10-12. Use yellow strips to make "eye"&"triangle" elements and fill the center of the leaf with them. Use orange strips to make borders of the leaf. So your leaf will be brighter ih the center and darker on the borders. It makes it more natural.

13. In the end you should glue the orange strip around the whole leaf.
14-15. Paint your leaf with the help of paints or inks and sponge. The rule is the same - brigth yellow in the center and darker colors near the border.

You can use it on your scrapbooking layouts, cards or as a jewellery piece.
Have a fun with quilling!

Great work. Thanks for the very clear instructions
ReplyDeleteBeautiful quilling and very clear instructions. Thank you so much for posting an English translation! Meg Crawford
ReplyDeletebeautiful work ...thanks for the tutorial...i m a new follower....gr8 job..cheers..
ReplyDeletecraftideas4u.blogspot.com
beautiful leaf. thanks for sharing!
ReplyDeleteNati from Brazil
http://natiquill.blogspot.com
Ladies, you are welcome! I hope this is useful and inspiring :)
ReplyDeleteVery pretty design! I like the way the shading adds dimension too.
ReplyDeleteI'm lost for words, Kate! Your project turned out so beautiful and looks so real. Excellent work!
ReplyDeleteHappy Quilling!
Manuela
My dear QuillingLadies! Thank you a lot for such marvelous words!
ReplyDeletegreat tut. thanks for sharing
ReplyDeleteI keep forgetting to tell you how much I enjoyed this tutorial. You did a wonderful job. Thank you for sharing.
ReplyDeleteTeddie
molto belle questi orecchini complimenti, passa da me www.metalfimo2.blogspot.com ciao da Giovanna.
ReplyDeleteWow! genialne są te liście!!!
ReplyDeleteOh my god!!! spellbound!!
ReplyDeletesuperb!multumesc pentru explicatii
ReplyDeletewow wow wow!!!! your creations are simply AMAZING lovely <3
ReplyDeletei love this tutorial. Your work is exquisite. what is the company name of your rubber stamp?
ReplyDeletewonderful, very thanks for sharing
ReplyDeleteAbsolutely beautiful work!
ReplyDeleteGreat tutorial.The instructions are easy to understand. Thanks a million.
ReplyDeleteOceni interesno, spasibo Katea!!!
ReplyDeleteVery beautiful and cleverly made
ReplyDeleteincreíblemente bonito gracias por compartir
ReplyDeletethanks a lot for the tutorial:)
ReplyDeletehttp://paperquillingmania.blogspot.in
Beautiful work........very clever <3
ReplyDeleteCudowne prace!! :)
ReplyDeleteTe kwiaty mnie urzekły swoją prostotą - cudne. Plaster miodu - jakoś do tej pory na to nie wpadłam, a mam digi stempel pasujący w sam raz. Pomysł na wykorzystanie stempla jako wzornika dla liści - rewelacja. Do tej pory raczej sama rysowałam, o ile w ogóle robiłam, bo ostatnio głównie zamówienia, a niestety jak ktoś coś zobaczy, to chce na ten wzór, podobne i nie mogę nawet za bardzo kombinować, bo czasu brak na nowe rozwiązania. Trzeba to zmienić! Dzięki za inspiracje :)
ReplyDeletePrace niezwykle zachwycające!
ReplyDeletePozdrawiam,
Katarynka
Вот это здорово! Желаю, чтоб Муза никогда не уходила!
ReplyDeleteHi Kate, thank you for the splendid tutorial. I've made one using your tutorial as a guide. I've also post your tutorial in my blog. Hope you don't mind.
ReplyDeletehttp://ardeepapercrafthouse.blogspot.com/2014/08/quilling-maple-leaf.html
super creation... look at my work as well.. visit my page.. www.av-visuals.com/quilling-1.html
ReplyDeleteWow, your works are amazing , i'm out of words , wow 💗💗💗 and the tutorials are very helping
ReplyDeleteYour work is Awesome. I've just started quilling, hopefully someday I'll be as good as you. Thanks for sharing your tutorial.
ReplyDeleteAmazing i learned a lot bij seeing your work and i am going to try if i can make it myself.
ReplyDeleteAcho que é o trabalho de quilling mais bonito que já vi. Parabéns!
ReplyDeleteSaudações brasileira.
Hi, can u pls show how. U made d border for d red husking flower in d pic. .one u hv show n is different from d red fliwer border ..love ur maple leaf...goung tomk on e ...will like to post d pic..... Thanks
ReplyDeleteYou have beautiful designs and tutorials! You are an inspiration for quilling artists! Loved the leaf tutorial! Thanks! Ana
ReplyDeletemaam please provide the tutorial of doing your sunflower earring. its amazing...awesome. I have no words to say.
ReplyDeletei love it >.<
ReplyDeleteyes I like your ideas and your work and thank you for sharing with us!
ReplyDeleteI love it, so pretty
ReplyDelete--------------------------------------------------------------------------------------
QUILLING CRAFTED GIFTS – 2D/3D LASER ENGRAVED – LASER CUTTING OBJECTS
Products: Quilling wall hangings, Quilling greeting cards ...
Office & Workshop: 42 Tan Thoi Nhat 21St, Tan Thoi Nhat Ward, Dist 12, HCM City, VietNam.
This comment has been removed by a blog administrator.
ReplyDeleteHola soy Norma del sur, sur de Argentina.
ReplyDeleteGracias por presentar tu blog y permitirme aprender con vuestros tutoriales.
Son asombrosamente bellas vuestras obras y te tengo en los blogs que desde ahora sigo.
Estoy realizando las hojas para luego aprender la flor.
Muchas gracias.
Un saludo y gran abrazo.
Fantástico!!! Pretty!!!
ReplyDeleteDoes anyone know the html circle symbol?
ReplyDeletejavascript canvashtml canvas editor
Хорошая статья, я нашел Вас в Яндекс, зайдитей также сюда и подберите себе качественную мебель http://profimebel.com.ua/
ReplyDeleteBeautiful! I hope to see more tutorials from you...keep me coming!
ReplyDeleteBeautiful work-Excellant tutorials
ReplyDeleteI visited your blog for the first time and just been your fan and get many informative information about the DIY tutorials.
ReplyDeletenew tutorials
Muchas gracias por tu blog me sirvió mucho desde Colombia gracias bendiciones
ReplyDeleteWow wonderful ideas i really like it for more gifts ideas visit send gifts to Pakistan
ReplyDelete